Files and Project Organization
Files
The files tab displays information related to all the audio recordings and the transcripts in the project.
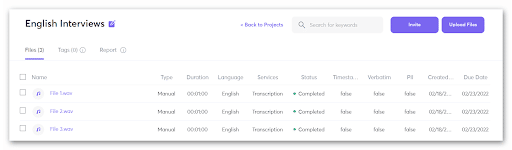
Name – The name of the recording/transcript.
Type: The type of transcription order created while uploading the recording.
- Automatic – Machine generated transcript.
- Manual – Manually generated transcript by our expert transcriptionist.
- Both – Automatic generated draft with edits made by our transcribers.
Duration – The total length of the recording.
Language – The language of the recording.
Services – The service that was chosen while creating the order:
- Transcription
- Translation
- Analysis
Status – This column indicates the current status of the file being processed:
- Uploaded – There is currently no activity being performed.
- In Progress – The file is being processed by the AnT team.
- Completed – The file has been processed and is now ready to view.
Timestamps – Timestamps are displayed besides each speaker attribution.
Verbatim – Verbatim transcripts capture every word, sound, pause, repetition of words, filler words, slang words, stammering, etc.
PII – De-identify and redact Personally Identifiable Information (PII) and Protected Health Information (PHI)
Created Date – The date the file was uploaded.
Due Date – The date the transcript is due.
Frequently Asked Questions
Please refer to the “Instructions to create project and upload recordings” article.
Note: It is mandatory to upload a file in order to create a new project.
To delete a project, from your main projects page, under the ‘Actions’ column, click on the three vertical dots and select ‘Delete Project’.
Note: You will be unable to delete a project if there are any files that are currently being processed.
There are two ways to rename an existing project.
- Method 1: On your main projects page, under the ‘Actions’ column, click on the three dots and select ‘Rename Project’.
- Method 2: Enter the desired project, click on the Edit button next to the project name at the top, rename the existing project name and click outside.
To rename a file, please follow the steps outlined below:
- Enter the project.
- Select the file that you want to rename.
- In the bottom menu that appears, click on the last icon ‘Rename’.
- In the pop-up menu that appears, change the filename and click on confirm.
We recommended our customers to share any useful documents and information that will aid with the transcription, translation and analysis. This includes the interview guide, abbreviations, acronyms, technical/medical terminology, and list of names.
To upload the documents, please follow the steps outlined below:
- On your main projects page, click on the three dots under the ‘Actions’ column.
- In the menu that appears, click on ‘Upload Project Guide’.
- On the final upload screen, simply drag and drop the file(s) and hit on the submit button.
To download an uploaded recording, enter the project, select the file that you want to download.In the bottom, a menu will appear. Click on the second option ‘Download Media’.
To delete a file, enter the project, select the file that you want to delete.
In the bottom menu that appears, click on the third second option ‘Delete’.
To move a file from one project to another project, select the file that you want to move.
In the bottom menu that appears, click on the fourth option Move’.
In the pop-up menu that appears, select the project that you want to move from the dropdown list.
Note: The new project where the file is being moved has to exist in order to show the pop-up.